Friday, November 23, 2012

Slow Going

     While scratching away at the chopsticks produced a lot of little shavings, it hasn't produced much difference in the taper on the end. I am going to have to take it to the shop and put it to the grinder, or sandpaper or a rasp. In any case, Thanksgiving has put the kibosh on finishing up the model this week. The kids are home from school and we have traveled to the in-laws.
     I have had some inspiration this week. While walking through town, I decided to stop in at a local used book store. It is wall to wall to ceiling books in this place. I was hoping to find a good deal on a boat building book, so I can let the library loan out the ones I've been using. I didn't find anything I couldn't live without, but I did spot a wonderful little book.

The Simplistic Sailboat

     It is written by Dan Hookham and chronicles a summer of sailing he did with his wife and young daughter. As you can see by the cover and the title, this was a modest and economical boat. I am about half way through the book and I really enjoy it. The trip took place in the Puget Sound, around my home town. His philosophy about work and living simply is a little too Walden Pond for me, but I appreciate his sentimental feelings regarding family. He takes note of simple pleasures and shared experiences a family can have while living in close quarters at the constant edge of the wild and outdoor life. That he could make so inexpensive a boat for cruising around the sound, motivates me.
     The other bit of motivation and good fortune occurred while spending Thanksgiving at my in-laws house. My Father-in-law and his other son-in-law replaced the banister on the stairs last year and apparently they had a little SNAFU. This left them with an 8' solid oak stair rail they couldn't use. He was happy to give it to me, so his wife wouldn't have to keep looking at it in the garage. I may make strips out of it for the gunwales or use it to make cleats for my boat. No matter how I slice it, it was a good score.

OAK!


Monday, November 19, 2012

What kind of Sail?

     In order to get a better understanding of the differences between the different ways that you can rig a boat for sail, I picked up a book at the library. "The Working Guide to Traditional Small-Boat Sails"
This book is jammed full of information. The downside for me is the incredible amount of jargon and lingo. I realize that the things on a boat are unique and their names come from a long history of sailing and sailors from all corners of the world, but the book is aimed at people who are already familiar with terms like; leech, luff, clew, and snotter.
     After getting about half way through the book, I am starting to understand some terms and get an idea of what kind of sail I want. So I am sacrificing a couple of chopsticks to the cause and making a mast and spar.

First I had to carve off some of the length on the spar
Now I am using the X-acto knife to shave a taper into it.

     I am going to try and make a "Gunter rig" for my little model. The advantage being that all the pieces should be short enough to stow inside the hull of the boat, but still give me enough square footage to move an 8' dinghy. I have some line for the model, but I haven't found a material for the sail yet. I suppose I could use paper, but that just doesn't seem right. I'd like to use something that simulates the action of a canvas or Dacron sail at this scale.

     Couple more photos of the D5 model. The forward deck and Frame A are not installed because I have not decided how I want to step the mast or build it into the boat.

Handsom Transom. Added some flare not on the plans.

I like those curves

Looks like a boat.


Saturday, November 17, 2012

Model Looks Good

      Looking pretty good. If I don't say so myself.

Model of D5 boat from Bateau.com next to Boyscout Racer

     Got the last coat of red paint onto the hull. As I was passing through the spare bedroom I realized that the Boyscout Racer I made when I was 9, is the same color red. I doubt the boat will be as fast as the car was.
     Can't decide what I want to do with the paint for the rest of the boat. I may get a wood-like brown for the gunwales and go with white on the inside. I'll definitely buy a better brush this time.
     I was glad to have my mineral oil ready today. I dropped the boat and it flipped, wet side down, onto the kitchen table. A couple drops of oil and a paper towel wiped the paint right up.
     Picked up a couple of new books at the library. One is called, "The Complete Canvasworkers Guide". It shows how to make canvas; tops, bags, covers, flags, and other assorted items. Looks interesting. The other is "The Working Guide to Traditional Small-Boat Sails". If I make my own sailboat, I am sure I'll want to make my own mast and sail. This book looks like the one to help me pick a design and make it.

British Crimson

     Second coat of paint.

Model of Bateau.com D5 boat with 2 coats of Model Masters British Crimson

     Again, I had to pick hairs out of my paint job. I saved 4 bucks on the brush, but next time I'll spend a little more money. The fortunate thing is that the paint is pretty forgiving.
     I did notice as I started with the second layer, that your fresh paint can dissolve the first layer. I was trying not to put much paint on and make multiple passes at the same spot to get the coverage I wanted. This did not work. It was best to get the brush medium wet with paint and then lay it on in one pass. Get more paint and then start where your last stroke ended.
     Since I added the gunwales first I had something to hold onto while I painted the Hull. I haven't decided what color to paint the gunwales, but I have to say that the Ziploc blue doesn't look to bad on the transom. I may go with 2 colors on the hull so I can have a waterline.
     In the background you will see the book I am reading, Ultrasimple Boatbuilding by Gavin Atkin. I read this one before, but I must say it makes much more since after having read a couple of other books and spent some time on the internet. Not that the book is complex. There is some jargon, though it is usually explained straight away. Just having the mental pictures in my brain help illustrate the book. I can also see how this authors opinion differ from others. This helps me form an opinion of my own based on the arguments of multiple builders. I can also spot the things that are the same from one book to another. This emphasizes their importance.
     If you want to jump in feet first and whip out something the kids can splash around in. I definitely recommend Ultrasimple Boatbuilding. The Micromouse is the first boat my son has shown any interest in.


Friday, November 16, 2012

Paint

     I decided to move on to painting the outside of the boat. I am done with the gunwales and quite frankly I was to excited about seeing my model with some color on it instead of Honey Nut Cheerios.
     I did a test on some spare cardboard with Crayola Poster Paint. While I love the pictures my kids paint with this stuff, It seemed kind of lousy for my boat. The color was dull and flat. I also didn't think I would ever get it to look smooth or totally cover the graphics on the paperboard.
     I decided to finally hit up the hobby store. The Hobby Town where I live, seems reasonably well stocked. I must say there is a surprisingly large collection of miniature doll house items. And not plastic beds and toilets either. I mean super detailed armoires and vanities. They have wall paper and wainscoting. This stuff is not for children. in fact, I am having trouble thinking of someone who would build such a thing, and not be creepy. Anyway, I didn't ask the hobby guy about that, but I did ask about paint. He said since I was painting something absorbant I should try a petroleum based paint.

Model Master's "British Crimson"

     So far it is working great. The deep red color looks great and the paint seems to flatten it self out as it dries. Which is fortunate, because I bought the cheapest paint brush in the store. The phrase, "You get what you pay for." seems to be a recurring theme on this project. Indeed, most of the advice I read about boats follow that logic. On the flip side though, you also hear people say "Don't pay for that, you can make one." I guess the common trait is that you have to have good materials. So the paintbrush I bought was adequate for laying down the paint. But only because the paint was decent quality. I did however wind up with a hairy transom. My cheap brush kept shedding and leaving hairs in my work. It took me a few minutes to pick them out.
     Another thing to be aware of with Petroleum based paints, is that water wont clean your brush. I took mine over to the sink and began to rub it with my fingers. The cold water made the paint congeal on the brush. Suddenly I was rubbing blood red goop all over my fingers. Shoot! I ran through what I know about petroleum in my brain. You can use another petroleum product to clean your hands. I wasn't about to go to the neighbors house with blood red fingers and asked for a tablespoon of Vaseline, so I started digging through the cupboard with the 2 clean fingers I had left. Finally I found a massage oil made with Mineral oil. I had to rub my fingers together with the oil and then wipe them off with tissue. I did the same with the brush, so I should be able to use it again tomorrow for the next 2 coats of paint. If not I'll just have to spend money for a real brush and a bottle of mineral oil.
D5 model gets first layer of paint

     I saw some very thin 6"x12" pieces of plywood at the Hobby store. If I make another one of these I might consider using real wood. I can't deny the thrifty nature of using a cereal box, but I could varnish a real wood boat.


Thursday, November 15, 2012

Rear View and Possible name

     Found some inspiration for the rear transom on another website.
Apple Pie Tender

Tracing the Transom

     I started by tracing out the transom. And then made a freehand sketch of the shape I wanted. This shape was inspired by the Apple Pie Tender. It gives my little boat more of a nautical feel and will also strengthen the rear of the boat for a rudder or motor.

Gluing a plate to transom of D5 model

     This part has been difficult to glue. Because I have glued on the rough side, it is absorbing a lot of glue. This will make it a stronger bond, but it causes the piece to swell. I have to keep moving the clips and even added 3 more, to keep all of it held down. It wants to bunch up and pull away from the boat. This is a problem unique to building the model and not the full size boat. Although I am sure that some methods of boat building, like strip canoes, might have something similar happen.
     The shape I drew gave me an idea for the name. My boat has a big rear end and this new piece looks a bit like a tail. I may have to name her after a hippo. Growing up with Hungry Hungry Hippos, it sounds a bit silly, but they are faster than they look in water, and kill a few thousand people a year in Africa. Very manly, I think.


Wednesday, November 14, 2012

Decided to add gunwales

     I found some very strong little clips at Fred Meyers for fifty cents a pop. I thought they might be useful for my model, or holding chip bags closed, so I grabbed a few.
     Turned out they were great for clamping down my tiny gunwales, while the glue dried.

Clamped gunwales to my D5 model. Plans from Bateau.com

     I used an x-acto knife to cut narrow strips for the gunwales. To make a straight line I used a chopstick.

Cutting the gunwales.

     This worked pretty well except that the gunwales absorbed some of the glue and actually lengthened. This caused them to pull away from a few areas, because they bunched up between the clamps. By removing and repositioning the clamps, I was able to correct most of this. Once they are dry I'll trim the ends and see about adding gunwales to the bow and the stern.
     I am trying to figure out how long the mast should be. My chopstick is only about 7 feet long once you calculate the scale. It seems like it ought to be 10 feet. But I don't having anything that would fit the bill right now. Maybe I'll pick up a piece of dowel at the hardware store.


More Glue and Play-Doh


    I switched to a light colored Play-Doh and that seems to have taken care of the discoloration problem. I recommend removing the Play-Doh once your glue has hardened some. Once Play-Doh dries out it will adhere to the rough sides of your paperboard. I tore the surface of my paper removing a chunk. This wasn't a problem for the side with graphics. They use a coating to get a smooth surface for printing, and it keeps the Play-Doh from adhering to it.
     Elmer's has proven very easy to work with. It is just runny enough to flow into thin gaps and it doesn't dry so fast that it is unforgiving.
     I have found myself using a spare bit of paperboard as an artists paddle. Daubing glue here and there. Scraping it into gaps, or smoothing out blobs. Sometimes I wipe away excess glue with it.
     I did have one instance where a bubble formed in the glue. My inattention allowed it to dry that way. I was able to cut the bubbles out with an X-acto knife and smooth it out with another layer of glue.
     The X-acto knife also came in handy on the skeg. For a full size boat, you would mark the curve under the stern onto your skeg and then cut, plane and sand it to fit. I don't have miniature tools for this kind of work, but I was able to take the edge of the knife and scrape away a nice concave curve into the skeg. It was a little uneven here and there. Once I slathered it with glue, those discrepancies faded away.
     The front tip of the skeg was a little crooked. It got bent while I was scraping it. I didn't put glue on the seam all the way forward, so that I could push the front edge straight with Play-Doh later and glue it when straight.
     One thing I forgot to mention. The skeg is very small when making the model. I knew that it would take quit a bit of pressure being under the boat. To avoid it's breaking, and to give it a wider surface area to glue, I cut a second skeg and "laminated" them together with a layer of glue. You could do 3 layers I suppose, but when it came to scraping it to shape, I was glad to only have 2 layers to deal with. It really is quite strong.
     The work is slow going since I am waiting for the Elmer's to harden before moving to another seam on the boat. This is giving me time to think about making it into a sailing version. And how I would like to paint it. And what to name it.

Tuesday, November 13, 2012

Keep Your Eyes Open

     While I was out for my walk this morning, I spotted something laying by the side of the road.

Old cutting board

     I don't have enough experience to identify the wood, but it is very dense, and quite hard. It looked like someone smashed it over the top of a fire hydrant and it separated at the glue lines, making 3 pieces. I don't know what I'll do with it. Mast step maybe, or cut it into strips for a seat. But considering what wood costs these days, I will continue to keep my eyes open. 
     I washed them up in the sink and put them in the trunk of my car. I'll take it out to the shop this week, so it can dry out. I am sure Dad can tell me what kind of wood it is.


Monday, November 12, 2012

Eureka for the Skeg

     I have been looking at this tiny thin wedge for the skeg. Wondering how I could possibly fix it to the bottom of my model. Scotch tape wont hold and how can I glue it. The idea came to me while I was looking at the Glen-L website. Customers send in pictures of the progress on their boats and I spotted someone working on a skeg. They just tacked a block of wood to the hull and clamped the skeg to it while the glue dried.
     Well, I can't nail a piece of cereal box to another piece of cereal box, so I needed something similar and readily available. Then I hit upon the idea of using Play-Doh. The only thing I was worried about was whether the pieces would warp from moisture or be discolored by the Play-Doh. So I did a test.


    The Play-Doh held a rather large piece straight up and down while I glued the opposite edge.


     I was right about the discoloration, but if the boat is being painted it will hardly matter.


     I glued the side that had the Play-Doh, and as you can see on the right, the Elmer's dried nearly invisible. The bond is surprisingly strong. This worked so well I decided to use the Play-Doh in a couple of other areas, where the frames and seats didn't line up perfectly.


     I also used a bit of Scotch tape to "clamp" the transom and rear seat. I cut the scotch tape by hand so that only a small edge was sticking to the boat.
     The pieces I cut for the forward frame and seat are really off. That is just as well, since I am thinking about adding a mast step and mast. That whole assembly will need to be modified. Not sure what I'll do about adding a centerboard, but I did pick up an X-acto knife yesterday.


Sunday, November 11, 2012

Baby steps

Model of D5 from Bateau.com

     Doesn't look like a lot of progress today. I am taking my time gluing the center seat section, because Frame C is warped. I can glue a part of an edge and then I have to wait until it dries before I can push more of it into place and continue gluing. The seat also, is not completely aligned with Frame B, but I believe I can successfully glue it if I set some weight on it.
     I am getting excited for my Dad to see it. I think I may hang it in his shop where I will build the real boat. For now, I'll keep it on the bookshelf in the living room. It should look pretty nice once it is painted. I wonder if I could make little oars or a sail for it.
     Maybe the wife will appreciate the idea of me building a boat a little more, if she sees one I have actually finished, sitting on the shelf. Of course this blog is called Wooden Boat Dreams.

Saturday, November 10, 2012

"It's cute"

     The wife got a good look at my model today. She is not used to me doing things with Elmer's glue at the kitchen table. I'll have the pipe cleaners and googly eyes out any day now.
     I cut out the remaining pieces of the model using the first set of pieces as template. This will make my life so much easier if I want to make a second model. Especially if I make one out of real wood.


     The downside of tracing a second time, is that the pieces get a little larger each copy you make. The pieces for my model are third generation. I didn't think the difference would matter because the pieces were small, but the reverse is true. A 32nd of an inch on my model would be a 1/4 inch in real life. That adds up quick when you put a transom, side panel, and bow together. I soon realized I would have to make the frames and seats a little wider.

My son needed our bear to try out the dinghy

     Another difficulty I had, was my glue bottles. The lids had been left open and the glue was stuck in the nozzles. A spin through the dish washer loosened up the gunk. I pried the orange caps off and picked the chunks out with a pickle fork. Good as new. In fact I managed to squirt a little to much out when I went to use them.
     Once I had the hull assembled, I tried to fit in the frames and seats. On the real boat, the frames would go before the hull, but I didn't see the point in building a jig to hold up a half cereal box worth of paperboard. In any case trying to fit a seat and frame piece in and hold the boat at the same time wasn't happening. My solution was to pre-tape the seats and frame pieces together.


     In the first picture you will see; frame b and c, and the seat, taped. In the second picture I have flipped them over. In the third I simply popped the seat up.


     When I tested it in place, it fit so well, I put a spot of glue on both sides. Tomorrow it should be solid enough for me to press the seat flat and glue around the remaining edges.
     And not to worry the white glue will all but disappear when it dries.


Friday, November 9, 2012

Lumbering toward a boat

     So Mega-hardware store, had crap wood for sale. I decided to try a recycler here in town. They have lots of used building material. If I am going to sand and plane it all anyway, who's the wiser?

Pile of trim boards at local recycler

     I was pretty sure I would be hard pressed to find any full size sheets of plywood, and I was right. They had some tables and furniture with big panels, and lot's of boards. These are comprised of old shelves, flooring and trim. I had hoped to find some inexpensive hardwood for the seats and gunwales on my future boat. Unfortunately the recyclers recognize decent wood when they see it, and it is priced accordingly. 3-5 bucks per foot for oak boards. The grain looks good and they are pretty straight, but they have varnish on them, paint splatters, staples and nails. I'll just have to keep my eyes open, for good deals on wood. Or bite the bullet.
     Leave a comment if you have any tips on where to get good deals on wood.

D5 Boat model made from cereal box

     I thought hard about how I was going to get the very thin edges of my cereal box model to go together. My first impulse was to scotch tape the whole thing. This seemed rinky dink to me, so my next thought was to glue the pieces with Elmer's glue. After a while it occurred to me that holding the exceedingly small edges of cardboard together with my bare and thick hands would be difficult.
     This is when my best idea hit me. In fact, I am sure I was in the shower. I would tape the outside of my nanometer joints, and glue the inside. My only concern was that the absorbent cereal box material would discolor or swell, when the glue was applied. I remembered reading "Instant Boatbuilding with Dynamite Payson"; and he was concerned about the strength of a butt joint between two boards with only fiberglass and resin to hold them. He was accustomed to scarfing the joint. So he did a test. He put his two boards together at an angle and joined them with fiberglass. He placed the point of his pieces upwards, then ran over them with his car. Fun experiment, that inspired me to try my own.
     I grabbed another cereal box. Honey Nut Cheerios. This time I used my carefully cut cardboard from the Kix box to trace the pieces onto the new box. I cut out a few pieces to try my methods.

Kix box template for D5

     I started with; the transom, a bottom panel, the side panel, and bow of the D5. For the transom I placed scotch tape the length of the seam on the outside. For the bottom and side panel edge, I used pieces every 3-4 cm.

Scotch taping the joint on my D5 model, before gluing

     On the inside edges I squeezed out a bead of Elmer's glue. Smoothing it out with the nozzle as I went.

Elmer's holds my D5 together.

     Better than expected. The glue dried clear and the little blobby areas shrunk away. It made for a very nice and surprisingly strong joint.

Barely noticeable joint of Elmer's, backed by Scotch tape on a model of Bateau's D5

     Now that I have half of the hull, I am trying to imagine putting in the frame pieces. I'll go back to the plans and try to construct it in my mind. Using Scotch tape means I have to put pieces together when they are fairly flat and bend or fold them into position. Hard to do when a single frame piece is touching  four separate components, all at different angles. I'll think of something.
     My experimental boat looks decent, so far. I may keep the original cardboard pieces for templates, since they were very easy to trace around. I could make a model a day, using the templates for lofting the design.
     More soon.


Thursday, November 8, 2012

The Old Days

     I may not be old enough to get nostalgic, but I am a little discouraged this morning. When I was a kid, my dad would take me down to the marina. We would walk along the docks and look at the boats.
     Fishing boats, yachts, live-aboard sailboats, dinghys, you name it. I enjoyed looking at the way everything was packed inside a boat. I liked figuring out what the different parts were for. I imagined the places they had been and where they were going. I loved reading the names of the boats. Some were clever, some were funny, some were "knotty".
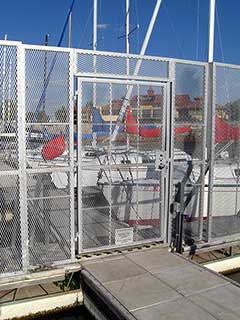
     Everyone down on the docks had something in common; an interest in boats. But now there are locked gates and barbwire at the front of the docks.

Not very friendly
     I decided to stroll down to the docks after walking my kids a mile to school the other direction. Three miles in I find, that all the gates are closed. I don't know anyone who owns a boat in the marina, and I am not bold enough to ask a stranger to let me in. What would my excuse be? I like boats.
     Once in a while I find myself down by the docks and they are open. Everyone is neighborly and no one argues with me about being down there. To be honest, if someone spent some time sharing the history of their boat with me, I would probably find myself sanding or varnishing something. That is how thankful I would be.
     So if you see someone gazing wistfully at the marina from the other side of the gate. Ask if they would like a closer look. You'll make an immediate friend.

Wednesday, November 7, 2012

Don't forget to title your posts...

     Got the pieces for the D5 cut out. It really needs a better name than that. I suppose I'll have to name the miniature one that I am making. This part of the process really wasn't very difficult. The hard part was cutting straight after I had the sides cut out. I got a little excited because I could push them against each other and imagine the final shape. On top of that the heater went off, as it does every morning, when everyone is scheduled to be out of the house. My fingers get stiff when they are cold.

D5 from Bateau.com cut from a single cereal box

      As you can see, unmistakeable boatness. I planned to put it together with scotch tape. I am pausing to think about that, because I believe the frame pieces may be difficult to attach inside the hull.
     It is hard to stop working when you see a task so close to being done, but in my experience five minutes of thought, saves me ten in redoing.
     I hope to get this put together today, but the kids have a half day and I need to do some grocery shopping. Also just got a text that the wife wants teriyaki for lunch. Awesome!


Tuesday, November 6, 2012

Obama and Romney

Had to take a break from boat related things today, so I could watch the election results come in. Lots of changes here in Washington state. Charter schools, Gay marriage, legalization of pot, and others. Staying up past my bedtime for sure.

Live model update

Bateau.com D5 parts cut out of notebook paper
     A quick post. I got the pieces cut out of notebook paper. If I had to do it again I would probably use an X-Acto Knife. I am sure I'll wish I had a sharp one when I start cutting these out of the paperboard.
     A very noble Kix cereal box, gave it's life for this project. "Kid tested, Boater approved."

A Hobby?

     The wife and I had a discussion about my wanting to build a boat.
"This is a hobby; something you do when you retire."
      Ladies, I love you; you know that. But this is one of those things that stings the very soul of a man. Not a dagger, mind you, but a sting.
     In her defense I have been laid off for two months, and she is concerned that my mind is out to sea. And she would like very much for my mind to get another job.
     The best way for me to process all this concern about getting a job and my wife's anxiety is to work on something with my hands. Put my creative mind to work and let my analytical mind wander for a change. So, let's build a model. Yay! And yes I see the irony.
Tracing the plans for the D5 from Bateau.com

     The plans from Bateau.com look pretty good to me. This is a small boat after all, and the parts are fairly simple. Do be mindful not to forget the little Skeg. It is the fin on the rear underside of the boat. I nearly forgot it.
     I grabbed some notebook paper and traced the shapes off of the plans. I intend to cut these out and transfer the shapes to my plywood... I mean Cereal box. Once cut out, I will try to tape them together into a boat.

^Love this book^

     I would like to note one thing, if you are making this yourself. Since the shapes for the frames, transoms, and seats are all symmetrical you can cut those out from the back or front of the cereal box, then flip the piece so the blank side shows out. The sides and bilge panels can be cut either way, as long as you do one from the blank side and one from the side with pictures on it. This way when they go on the boat, you can show the design outside or inside by merely swapping the sides.
     Wish me luck. I'd love to finish it before my wife comes home for lunch, but I don't want to rush it.

Monday, November 5, 2012

Workshop

     We recently moved into another rental, and this one does not have any place to work. This sucks. I have some decent power tools and hand tools, but no where to get anything done. No saw horses even. Fortunately my Dad has a huge shop. It is filled with his tools and projects, as well as, some of my brothers junk, but there should be some room for me to build a modest craft.
     So today I picked up my tools from storage and took them over to Dad's. I have a really nice jigsaw my father-in-law got me for Christmas, a Skilsaw, a Dewalt cordless reversible drill, a nice Stanley hand saw, etc. And my mini-fridge. Can't tell you how nice it is to stop the lawn mower and grab a cold beverage out of my garage fridge without taking my shoes off or tracking crud in the house.
     Dad and I talked about his days fishing. Not just rod and line, but honest gil-netting and purse seining. Some pretty hairy stories. Apparently he bought a 28' boat with a friend and they put a new cabin on it.
     Dad and I went through the books I got from the library and the boats they had. We also got out some plans that he gave me a while back, that used to belong to his friend. Larry? I think. The plans call the boat D5 from Bateau. Http://www.bateau.com. It's a cute little boat. There is a similar one in the book "Instant Boatbuilding with Dynamite Payson" called Ruben's Nymph. Dad had a clever idea, that I should build a model of one with the cardboard from a box of cereal. Then I'll get an idea of what it will look like and the way to build it. I will try to put some time into that tomorrow.
     Also looked at lumber today. I know almost nothing about lumber and I could still tell that Lowe's wood was all crap. Knotted, split, warped, crooked, and ugly. The plywood was even worse. The ply's were coming apart. I could see voids on the edges. Big ugly knot holes. Sad. I'll try Home Depot tomorrow and if that sucks as bad, and it probably will, I'll start looking at local hardware stores and the recyclers.

Papa Gene

     Mentioned to my grandfather, Papa Gene, that I was interested in building a boat. Turns out he has built four boats. A dinghy, a small row boat, a power boat about 20' for fishing, and the biggest of all was a 42' fishing boat called Four Winds. I guess he sold it before the cabin was put on, because the fishing rights changed in the Puget Sound and he didn't think he could fish with it. Last he heard it was still being used, and had been spotted in Bellingham Bay. If anyone reading this sees it, or knows of it, please let me know. My Papa Gene would love to know how it's doing or see a picture of it.
     Papa Gene is a great wood worker. I wish we lived closer together so he could help me with my projects. He did give me a bench plane to get started. It is a heavy duty Fulton, and worked great with a couple of scraps we tested it on. Something about sending thick curls of wood to the floor really makes me feel like a craftsman already.
My New Toy: A Fulton Bench Plane

     I had planned on starting with a real simple "1 sheet" boat, to get my feet wet, but Papa Gene encouraged me to try a larger, nicer boat. He said he believed I could to it. I think of all the things someone could do to help me, encouragement is the best.

Sunday, November 4, 2012

Fetal development stage

     For the last couple of years I have been considering building a boat. A confluence of factors has always stood between me and putting my ass in the water with something I have built.
     I can't tell you why I wanted to build a boat to begin with. As I have researched, during my free time, there is this growing allure. This slow seduction.
     This last week I took some definite steps towards building my dream boat. Towards giving in to the temptress.
     Part of any journey I undertake, is research. I don't jump into things half-cocked. I suppose I am over cautious, but I can't get comfortable with an idea until I have fleshed it out in my mind.  To that end I have spent some time at the local library. I can't tell you how much I appreciate our local public library here in Bellingham. They have a wonderful selection. I came home with 150 dollars worth of books about Wooden Boats, and all it cost me was 20 minutes walking.
     This is my first post about my boat dream, so the site is in it's fetal development stage. I'll start adding pictures and links soon. I hope to turn this into a kind of diary and eventually a ship's log.
     Fair warning: I know very little about boat building. My plan is to one day have a boat large enough for my family to take out to the San Juans overnight.